Posts

Showing posts from 2017

How to Add Banner Ad to your Project-Android.

Image
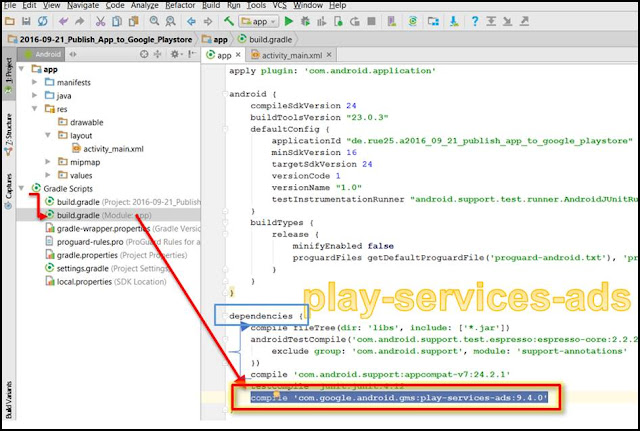
The First Motto of the Project will be GAINING CUSTOMERS once there is a huge support of the Customers the Second Motto of  App Development will be Earnings.One cannot simply develop any Application for free of cost for longer time.there should be some gain towards app development,One Such earnings is Ads. Here i Used the Ad Which was Provided by Google Admob.One of the Famous Ad Provider in the Market.Let us see how we can add Ad to our Application. STEP-1)Create an Empty Project. Create an Android Application with Empty Activity or Choose your Existing Application. STEP-2)Add Dependencies. Open build.gradle and add play services dependency as AdMob requires it. Add compile ‘com.google.android.gms:play-services-ads:8.4.0’ Here I used 8.4.0 Version,Make sure that you use the Version Used for all other Dependencies. STEP-3)Add Unit Id. Add the Ad unit IDs to your strings.xml. Open strings.xml located under res ⇒ values and add the ad units of Banner.

How to Send Notification through Firebase-Android

Image
Sending Your Daily Updates and Any Data to Android Application can be Easily Done as Dynamically Through the Usage of FireBase Cloud Messaging Service provided by Google services. This is Maintained as Free of Cost untill your usage crosses the limit of 1GB.Let us see how we can add Notification services to your application. Method-1 . Step-1 Open your android application and go to Tools->Firebase Clicking the Firebase link Opens Up the New Window as Below Choose Cloud Messaging in that Window Click on Setup Firebase Cloud Messaging Another Window Will displayed above this Window Step-2 A)Click on Connect to Firebase B)It Opens Up the Another Window I)Select Create new Firebase project and give the Name.This name should not to be equal as your play store Name.This name just for your identification. II)Select your Country Region. III)Click Connect to Firebase Button. This will take few minutes to create your application into Fir

How to Add Animation to Image in Android

Image
Adding an Animation to Image in ImageView is still the Best way of making Splash Screen.This Animation can make Your Splash screen still more interactive.There can be various animation available for a ImageView Here i will discuss some of the Animation File and How to Add Animation to your Android Application. 1)Create a ImageView in your splash Screen Let We Consider the Above Image.Let we add an Animation to this image.This image is actuaally placed by using ImageView. 2)Create a Folder anim under the res folder. 3)Create a Animation File as Fallows This opens the Dialog as Below Type the name and Press ok button. 4)Write a Animation File 4a)Blink Animation File Copy the Below code which gives a Blink to your Image File. < alpha android :fromAlpha= "0.0" android :toAlpha= "1.0" android :interpolator= "@android:anim/accelerate_interpolator" android :duration= "400&quo

Basic Terms For Writing XML code Instead of Drag and Drop

Image
Drag and Drop is the Most Easiest Way of Developing the Front End of the Android Application.Writing an XML Code Can Save More Time Than Drag and Drop.Searching various properties in the Properties panel will take Little Bit More Time than the Coding. As a Initial Developer We can't Except to know All the Properties in XML.But As Day Progresses Everyone should try to use usage of writing Code Directly instead of Drag and Drop.This also gives much more Confident than Drag and Drop in Development process. You can Switch Between Design View and TextView by Pressing the Tab at bottom of your Activity Screen as Below. Basics of XML: 1)layout_width and layout_height The Two Default Properties for Any  of the Android Component is layout_width and layout_height. Without these Two Properties One cant Create a Component.If an Developer leaves it Empty it shows the Error. When a User Types <TextView and Press Enter it Automatically asks two Components